Showing posts with label mud plaster. Show all posts

Sunday, November 25, 2007


B-r-r-r-r-r-r-it's winter!

Forty-six degrees when we got up this morning. Yes, I know, that's not really cold but it is for us baked desert dwellers.

Rick even lit the stove on Friday night but we did need to open the windows as it quickly got very warm in here. We had never lit the stove before so it was a shakedown. It performs perfectly, has a beautiful flame and will provide more than enough heat for this house.

Yesterday we repaired the damage created by that ferocious storm we had during monsoon season. It didn't take long, probably 5-6 hours of actual plastering. Rick also put in about that much time earlier in the week, digging up the clay (we created our own clay mine with what we had leftover) and sifting. And I enjoy doing it so it's not really a chore. Here is a comparison of the surface before and after:

From this..................................to this.............................................to this:


Amazing what a little clay, sand, water and fiber can do.

Me and the trusty companion, Gen.


The finished wall...


We're going to try some soy resin on the wall to stabilize it a bit more. Even though this is not a huge job, it's something I wouldn't want to repeat too often.

These pictures also show the patio. It's done with 8x16 concrete pavers placed in a random pattern with 3/4 minus river rock between. The curb is 3.5" poured concrete. About 3/4 of the pavers we got at the salvage yard, the rest from CABCO block company. I plan to stain the pavers and the curb a light brown so they won't be such a glaring gray. So far we like it but it does make it difficult to place chairs as they tend to sink in the gravel.

And one last picture of some of our landscaping as it matures. The hummers love these Orange Bells.

Thursday, January 11, 2007

The world is mud-luscious e.e.cummings


The drywall is finished and I hear it looks great. I haven't seen it yet as I've been working at the paying/healthcare providing job. Today I get to start on the final interior plaster. Of course the weather has been beautiful and warm all week and today the high will be 60s (not bad) but 30% chance of rain. However, that does mean 70% chance of sun!
(I know I'm weather-spoiled!)

The correct springs arrived for the garage door and it is now operable.

The kitchen cabinets are "in the works".

The gas line for the grill is finished and we, at long lost, have no trenches!
On to the mud...

(Here's the complete poem: In Just )

Sunday, December 24, 2006

Photobucket - Video and Image Hosting
Merry Christmas


We've been busy! Someone stopped by the house today and said she hoped we would be finished with the house by next Christmas...arrgghhhh!! I said something clever like " We will be unless...uhhhh....we're dead or something." People just don't understand the time it takes to build especially when it's not a production build. Oh well, some just don't get it.

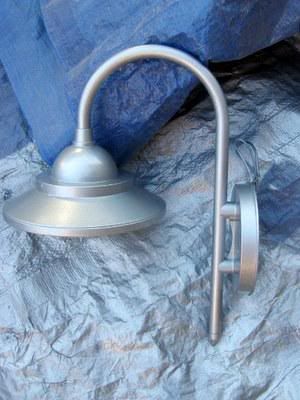
Here are the exterior lights I painted yesterday. They were a powder white and we wanted them to look galvanized. There are some excellent spray paints on the market now and you can get just about any finish/look you want. I LOVE paint! I think the lights look great-they will be on either side of the garage door, one on the people door of the garage and 2 on the south entry.

These I found on eBay for the ridiculous price of about $9.00 apiece. They are very sturdy lights and came with compact fluorescent bulbs-GONGA d
eal.
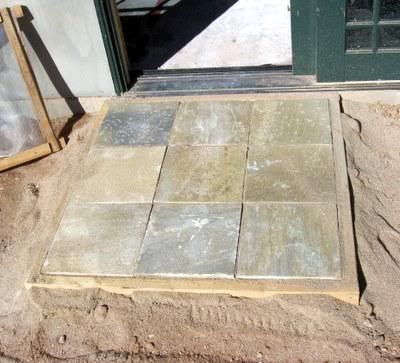
Here are the "stoops" we made in order to be able to get our CO. This is the slate I found on Craigslist and will eventually be the front porch/patio but for now it's appearing as the door stoops. The coloration of the slate is beautiful.


My project for today was to tape the joints on the brown walls. We asked that the rockers hang the rock wrong side out so that I would have a unsealed surface to apply the earthen plaster. When Rick asked the contractor if he had ever hung drywall brown side out he replied: "Not on purpose". I taped the joints with the standard mesh tape and homemade joint compound. To make this I used clay and a bit of sand sifted through a window screen. To the dry ingredients I added water and allowed the clay to hydrate. I then added a bit of homemade wheat paste (cooked flour/water). When combined it looks like chocolate mousse, almost good enough to eat. I taped the seams and applied the mud as usual but didn't have to worry about smoothing it as another layer of earthen plaster will be applied. One bright note, if you've ever drywalled you know you have to be careful of the "mud" drying because it leaves "rocks" in the mix which makes the knife work difficult to say the least. With the real mud this is not a problem, it all just mixes together and re-incorporates beautifully.

Photobucket - Video and Image Hosting

This is looking into our compact kitchen-it will be so efficient. Lovin' it!
Photobucket - Video and Image Hosting

This is a shot of one seam mudded, one seam just taped and the brown side of the drywall.
Photobucket - Video and Image Hosting

Photobucket - Video and Image Hosting Cooking lunch in our solar oven.

We may work some tomorrow-or we may just sit, listen to Christmas carols and drink coffee. No matter, we wish you and yours a Merry Christmas and a Prosperous and Happy New Year!


Friday, December 15, 2006

Playing in the Mud
Plaster Party

Photobucket - Video and Image Hosting


Last Saturday some friends came to help celebrate my birthday and apply the first coat of interior earthen plaster. We had a great time and thanks to Sam, Connor, Dave and Shayne, who kept us supplied with mud, we were able to get the first coat done by about 1pm.

Photobucket - Video and Image Hosting

Amy and Olga

Photobucket - Video and Image Hosting

Sam and Shayne

Photobucket - Video and Image Hosting

Connor


Photobucket - Video and Image Hosting

Thel...errrr Loui......uhhh Robin!

Photobucket - Video and Image Hosting

New acquaintances, Phyllis and Mary, who hope to build a strawbale cabin in NM.

Photobucket - Video and Image Hosting

I must have been tired, because the camera shook. This is Mariel who came with her husband Bill and MIL Elsa. They also helped with the wall-raising and Bill helped put the roof on.

Photobucket - Video and Image Hosting

Casey, Me, Donna

Photobucket - Video and Image Hosting

Karen and Victor

Photobucket - Video and Image Hosting

Rick, Michelle

Photobucket - Video and Image Hosting

Lunch time!

Photobucket - Video and Image Hosting

Finished wall-we had to leave that space above the first course because we hadn't had the electrical inspection yet.
We have now been inspected and we passed! But not before having to run out and buy and install fire alarms....duhhh!

We were so busy we didn't get pictures of everyone but we sure appreciate all the help and encouragement.

We now have the garage roof finished and the "driveway", all 4 feet of it, poured. Victor will begin the stucco on Saturday.

Kitchen cabinet decisions have been made-they will be Plyboo! I was having a difficult time deciding what to use then picked up a copy of one of those glossy home mags and there it was, The Answer. I was drawn to the mag because our neighbor's house is on the cover. This issue is dedicated to "green" building and living.